Get started · hopsesh 0.3.0
Get started with hopsesh
hopsesh brings a Claude Code or Codex session from any of your machines to the one you are on, or continues it in the other agent. This walk-through takes you from installing it to your first move, and back again with undo, in the terminal or in the app for macOS and Windows.
1What you need
- A computer running macOS, Linux or Windows. The command-line tool and its terminal UI run on all three; the app needs macOS 13 or later, or Windows 10 or 11 on x64 or Arm64. hopsesh is alpha: it works end to end on macOS and Linux, and the Windows app and installer are tested in CI on Windows Server 2025, including the real window.
- SSH access to your other machines. Any machine you can
sshto works, including aliases, ProxyJump and ProxyCommand from your~/.ssh/config. Tailscale is not required; it just makes machines easy to find. The other machines need only an SSH server (Remote Login on macOS, OpenSSH on Windows) and their sessions. A machine without SSH keys can log in with a password. - Claude Code, Codex, or both. hopsesh lists and moves the sessions they already keep. To continue a session in the other agent, that agent must be installed on the machine you continue on.
Nothing needs installing on the other machines. hopsesh runs there only if you want to send sessions to them (step 6).
2Install hopsesh
On macOS and Linux:
curl -fsSL https://raw.githubusercontent.com/roeehrl/hopsesh/main/scripts/install.sh | sh On Windows, in PowerShell:
irm https://raw.githubusercontent.com/roeehrl/hopsesh/main/scripts/install.ps1 | iex
Both check the download against the release’s checksums.txt and its
signature, and hopsesh update installs later releases with the same checks.
Other ways to get it:
- macOS app: download the signed, notarized
.dmg(macOS 13 or later, Apple silicon and Intel), open it and drag hopsesh into your Applications folder. It is the same engine as the command-line tool. - Windows app: download the installer (Windows
10 or 11, x64; Arm64). It installs for your user only, with
no administrator rights, into
%LOCALAPPDATA%\Programs\hopsesh, adds a Start menu entry and an uninstaller, and puts thehopseshcommand on your PATH, so you don’t need the PowerShell line as well. It uses WebView2, which Windows 10 and 11 already have. A portable.zipof the app is on the release page.The installer isn’t code-signed yet. Windows SmartScreen says “Windows protected your PC”: click More info, then Run anyway.
- Linux packages:
.deb,.rpmand.apkfor amd64 and arm64 are on the release page, for example:sudo apt install ./hopsesh_<version>_linux_amd64.deb - From source (Go 1.26 or later):
go install github.com/roeehrl/hopsesh/cmd/hopsesh@latest
3Allow and trust a machine
hopsesh finds your machines in Tailscale and your ~/.ssh/config, but it
connects to none of them until you allow one. Then it uses your own ssh, keys
and agent. Here the other machine is called studio:
hopsesh hosts                 # machines found in Tailscale and ~/.ssh/config (connects to nothing)
hopsesh hosts allow studio    # let hopsesh connect to one
hopsesh trust studio          # confirm its SSH host key
hopsesh checks host keys strictly. A new key is marked verified when it matches the key Tailscale reports or one you already trust; a changed key is a hard stop. To check that everything is in place on a machine:
hopsesh doctor studio # agents, SSH, host trust and the skill
A machine that logs in with a password instead of a key is added with
--password. Better still, hopsesh hosts setup-key logs in once
with the password, adds your SSH key there, checks that key login works and forgets the
password (macOS and Linux machines):
hopsesh hosts add nas alice@192.168.1.20 --password
hopsesh hosts setup-key nas
The password is kept in the macOS Keychain or Windows Credential Manager by default, or asked for with a hidden prompt, and never written to hopsesh’s files or a command line.
4Bring a session here
Run hopsesh with no arguments for the terminal UI. It lists the Claude Code
and Codex sessions on this machine and every machine you allowed, grouped by repository,
with the branch, worktree, last prompt and whether each is running. Pick one to move it
here; as everywhere in hopsesh, you see the plan first, and at the end it prints the
command to continue.
hopsesh # browse sessions and move one hereThe same from the command line:
hopsesh ls                              # every session, grouped by repository
hopsesh plan studio:"fix flaky tests"   # read-only preview of a move
hopsesh pull studio:"fix flaky tests"   # plan, confirm, move, print the command
A session is named [<machine>:][<agent>/]<id-or-title>.
Leave out the machine to take the newest copy anywhere, and leave out the agent when the
title or id is unambiguous.
pull finds the repository here or clones it, recreates the worktree, brings
the code to the session’s commit (fast-forwarding a clean checkout, never merging,
rebasing or stashing) and rewrites paths for this machine. The copy left behind is marked
in its agent’s own list as ↪ moved to <machine> · <title>.
Later, hopsesh pull <id-or-title> without a machine name brings back
the newest copy, adding only the new work.
If both copies changed, the move stops until you choose --keep-both (a
separate session) or --replace (the copy here is set aside;
hopsesh undo brings it back). hopsesh never merges.
5Continue in the other agent
Add --in codex or --in claude to continue a session in the other
agent, on another machine or this one. Run plan first: it changes nothing and
shows what carries over.
hopsesh agents                                     # supported agents and what's installed here
hopsesh plan studio:"fix flaky tests" --in codex   # see what carries over, change nothing
hopsesh pull studio:"fix flaky tests" --in codex   # then do it
Every plan shows a loss report: what was kept, what was shortened or summarised, which paths were mapped, and what is left out. Reasoning from the other vendor is never carried. It also shows the briefing the other agent gets: where the session came from, what to verify first, the open plan, and instruction files only the previous agent read.
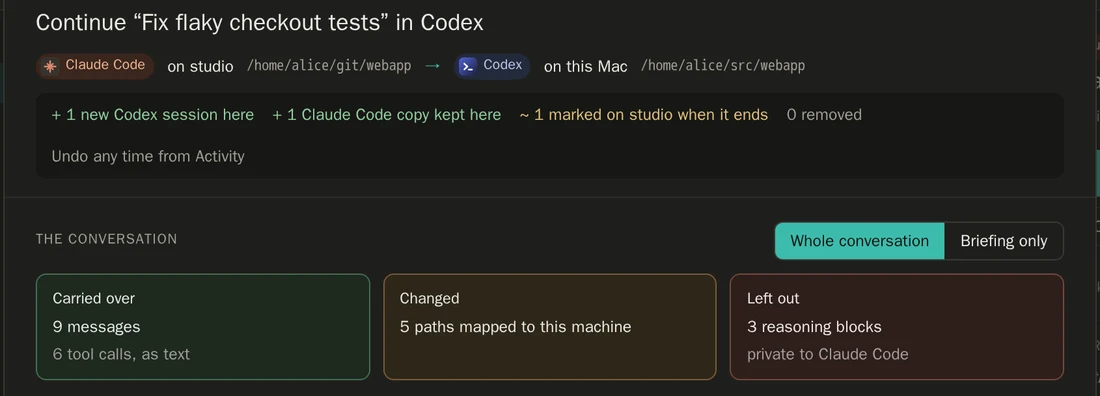
-
--fidelity history(the default) brings the conversation as text;--fidelity notebrings only a briefing. -
--via importlets Codex’s own importer convert a Claude Code session; hopsesh adds its briefing and keeps it undoable. -
--note-fileadds your own handoff note, and--carry-rulesyour instructions for every project. -
Nothing is sent to a model unless you start the session.
--gostarts it with “Continue.”
Bring the session back to its original agent later and only the new work is added, so the original’s earlier turns, including Claude Code’s signed reasoning, stay byte for byte.
6Send a session to another machine, and undo
pull needs only SSH on the other machine. When that machine runs hopsesh too,
you can also send a session from here. Receiving is off by default, so turn it on there
first:
hopsesh receive on               # on the machine that receives (off by default)
hopsesh push 7f3c2a1e laptop     # on the machine that has the session
The receiver plans with its own agents and settings against a read-only copy of that session’s files; it can’t read or run anything else on the sender. Nothing changes until you confirm. Both sides must speak the same hopsesh protocol version; otherwise hopsesh asks you to update.
Every move and continuation can be undone, on every machine it touched. After a push,
hopsesh undo on the sender reverses both machines.
hopsesh undo            # undo the newest move or continuation
hopsesh undo --list     # what can be undone
hopsesh undo <id>       # a specific one
Undo removes new files, restores replaced ones, cuts off appended records and brings back
set-aside copies. It refuses when a session it would change was used since, because that
work would be lost; hopsesh undo --force does it anyway.

7The same steps in the app, on macOS and Windows
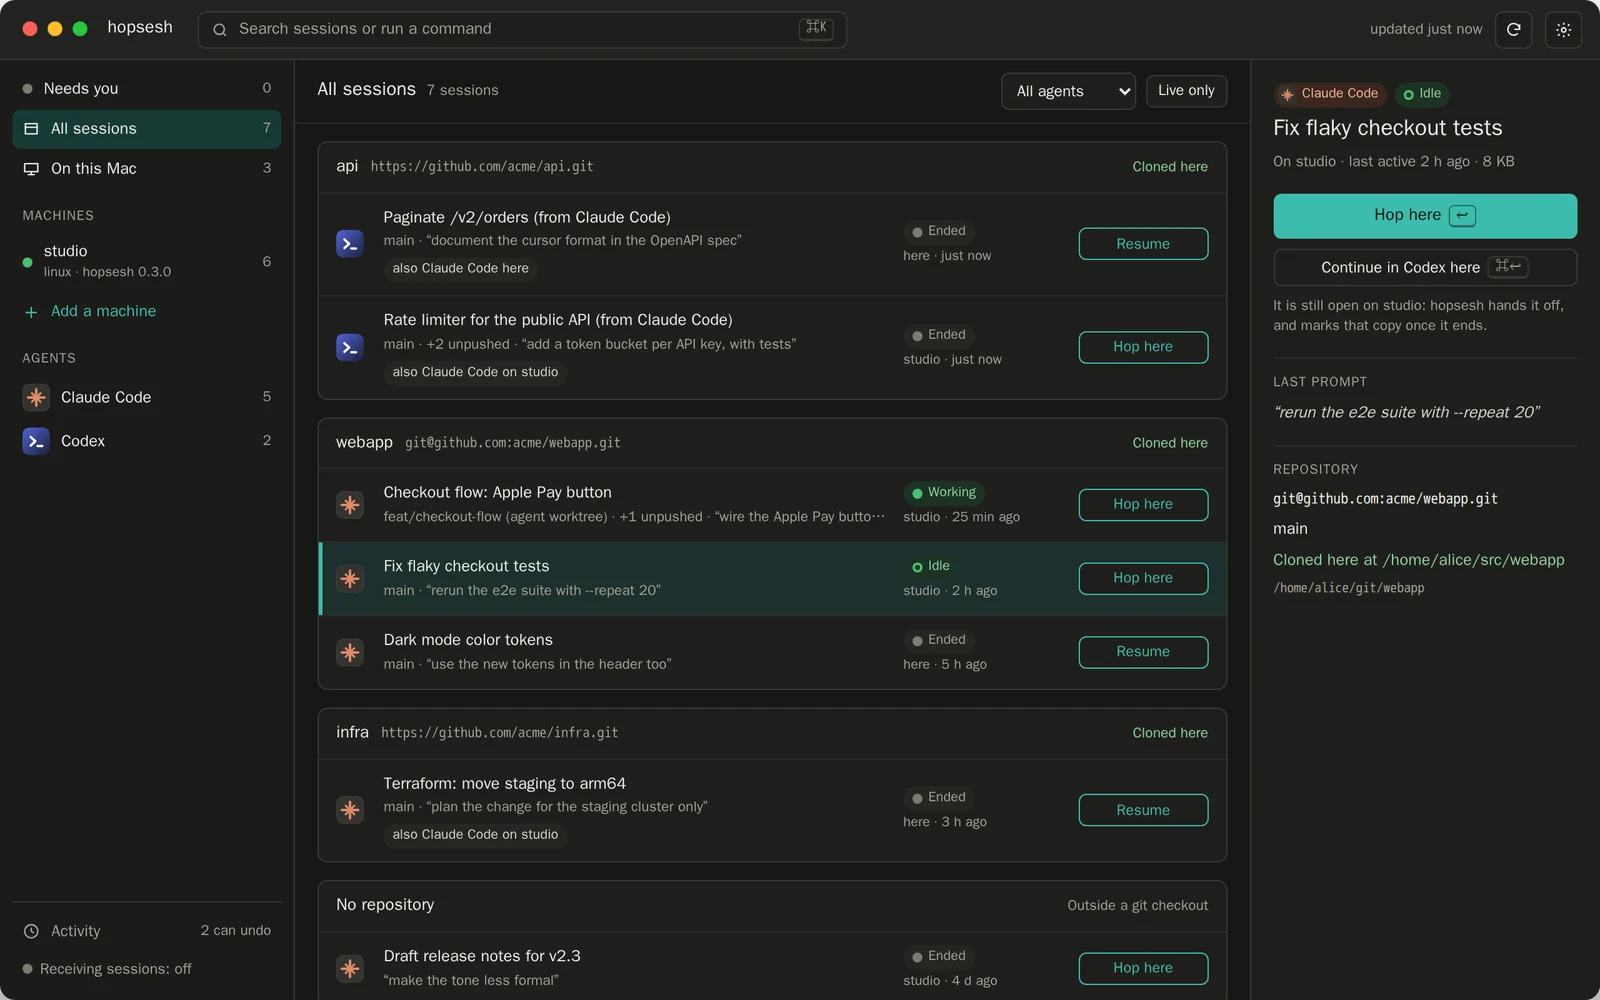
The app runs the same engine as the command line, with a plan sheet for each move.
It is the same app on macOS and Windows. On Windows it says “this PC” where macOS says “this Mac”, and its shortcuts use Ctrl in place of ⌘: Ctrl+K, Ctrl+R, Ctrl+1/2/3, Ctrl+, and Ctrl+Alt+Z. The pictures here are from macOS, except the last one, from Windows.
- Add a machine on the Machines page. It lists what discovery found in
Tailscale and
~/.ssh/config; add the machines you want, and confirm each one’s host key. For a machine that logs in with a password, tick “This machine logs in with a password” when adding it, or use the Login button, then “Set up key login”. On macOS 15 and later, the app asks for Local Network access the first time it reaches a machine on your LAN; Tailscale connections aren’t affected. - Pick a session. Scopes run down the left (Needs you, each machine, each agent), sessions by repository in the middle, and the selected session on the right, with Hop here, Continue in… another agent and, for a session on this Mac or PC, Send to… another machine. ⌘K (Ctrl+K on Windows) finds any session or command.
- Read the plan, then go. Each action opens the plan as a sheet: what is added, changed and removed, the loss report, the repository and code, and buttons that fix whatever blocks the move. The result page gives the command to continue, opens it in a terminal or the agent’s app, and has Undo. On macOS that is Terminal; on Windows it is Windows Terminal, or PowerShell when Windows Terminal is missing.
- Receive sessions. To let your other machines send to this computer, turn on the Receive sessions switch (in Settings, or on the Machines page). It is off until you do.
- Undo from Activity. Activity lists every move and continuation with its own Undo, and asks before it throws away work done since.
- Settings. The Command line tab puts the
hopseshcommand on your PATH with no administrator password (on macOS a link into the app, on Windows the app’s folder), and the Skill tab installs the hopsesh skill into your agents. A password you save for a machine is kept in the Keychain on macOS and in Windows Credential Manager on Windows, on by default. - Updates. Settings → Updates → Install and
restart installs a new release. The app checks its signature and checksum, on
macOS also the Apple developer and notarization, and then reopens itself. Running
hopsesh updatewith the command that comes with the app updates the whole app too.


8If something goes wrong, and what next
- Start with
hopsesh doctor <machine>. It checks the agents, SSH, host trust and the skill. - A machine’s host key changed. That is a hard stop: hopsesh will not connect to it.
- An alias’s LAN name doesn’t resolve. hopsesh falls back to the machine’s Tailscale name.
- The session is still running on the other machine. By default hopsesh
copies it as it is, and the copy left behind is marked when that session ends. With
--fork, both copies continue independently. - Ask your agent instead.
hopsesh skill installputs the skill into Claude Code and Codex. Then ask “bring my laptop session here” or “continue this in Codex”: the agent plans first and moves only after you say yes.
Read on:
- How to move a Claude Code session to another computer
- How to continue a Claude Code session in Codex (and back)
- Everything hopsesh does, and its privacy policy
- Found a bug or have a question? Open an issue on GitHub, or start a thread in Discussions.